
Hp 15 Laptop Black Screen After Login
Z7_3054ICK0KGTE30AQO5O3KA30N0
hp-concentra-wrapper-portlet
![]() Actions
Actions
HP Notebook PCs - Troubleshooting Black Screen Displays with No Error Messages During Startup or Kick
Startup Symptom: LEDs glow, but computer fails to startup or boot, and displays a black screen
| Utilise this document if the LEDs glow to indicate that power is available and the sound of a fan or spinning hard drive can exist heard, merely no colors, images, or text are displayed on the LCD brandish. | Do non utilize this document if there are no sounds from the estimator when the power is turned on. You should cheque for a unlike trouble; such as a loose RAM memory chip or disconnected hard drive. |
The cause of this trouble may be the failure of a hardware component, or an error in the instruction beingness sent from the BIOS to a hardware component.
Before yous brainstorm troubleshooting your computer
Before you brainstorm troubleshooting your figurer, perform the following steps:
Stride two: Connect an external monitor to test the display
The notebook's screen display may remain black when there is a corrupted graphics driver, or a problem with the LCD display's dorsum calorie-free. You lot tin test the display by attaching an external monitor and restarting the computer. Testing with an external display is helpful if the notebook display is black only you tin can hear sounds; such equally fans, spinning drives, or beep tones which indicate that the calculator is operating. If you can hear sounds of functioning but no image is visible on either display, contact an authorized repair center.
-
If there are no sounds from the computer when the ability is turned on, check for a unlike problem; such every bit a loose RAM memory chip or asunder hard drive.
-
If you are having trouble viewing the external monitor, click f4 (or the key with this symbol
 ) to switch the screen image among brandish devices connected to the organisation. For example, if a monitor is connected to the figurer, pressing this key alternates the screen image from computer display to monitor display to simultaneous display on both the computer and the monitor.
 -
If an image displays on the external monitor, there may be a graphics driver conflict with the notebook'southward LCD display. With the external monitor connected, download and install the latest drivers for your specific computer and graphic chip set.
-
If you do not have an external monitor, it may be possible to see an image by switching the LCD display to a low resolution mode. To modify the resolution, turn on the computer, and press the f8 key. If the graphic display is working at the BIOS level, a text screen displays and you can select the Enable low-resolution video option. If the graphics display is non working at the BIOS level, contact an authorized repair center.
Every bit a terminal action, if there is an epitome on the external monitor and y'all accept installed the latest BIOS, updated CPU fries set, and updated graphics drivers but the notebook display remains blackness, the LCD may be defective. Information technology may be necessary to contact HP for technical assist or send the notebook for service to supercede the display.
Footstep three: Disconnect all peripherals and repeat the hard reset
Even when instructed to disconnect all peripheral devices from the notebook before doing a difficult reset, some devices are oft disregarded.
Double-bank check that all devices are disconnected including: external keyboard and mouse (wired or wireless), USB connected external drives and devices, thumb drives and wink drives, network storage devices, PC card, SD retention cards, express card, eSata connections, firewire or similar devices, printer, scanner, camera, port replicator, or docking station, whatsoever CD/DVD from the optical disc bulldoze, and any media from the multi-carte reader.

Proceed to the Examination for memory module problems section.
Examination for retentivity module problems
When you try to plow on a computer, one of the first hardware tests performed is the retentiveness bank check. If the start upwardly test cannot access the retentiveness chips, the testing stops and no additional actions can be taken. In other words, when yous press the ability push the LEDs may glow for a moment and a fan may first to spin, but then all action stops.
This problem must be resolved before yous tin can boot into the BIOS or Windows and perform any other tests.
Some HP Notebook PCs come with 2 sticks of memory and accept two memory slots. If you experience a black screen fault, the problem could be with 1 of the sticks of memory or with one of the retentivity slots, or i of the sticks may non be seated properly in the slot.
The retention module compartment on nigh notebooks is located on the lesser of the instance. The verbal position varies by model. Still, on some models, the memory compartment is under the keyboard. See your User Guide for the exact location of retentivity modules on your notebook.
Check for loose memory modules
Normally, a computer will not display an image if a memory module is loose. However, in some cases, if a memory module is loose or is non making good contact with the memory slots, the estimator may responds only does not recognize all of the memory. Reseating the retentivity module may resolve retentiveness failure errors. To reseat the retentivity module, take the memory module out of the memory slot and then put it dorsum into the slot to become a better connexion so that the computer can recognize the memory.
The retention module compartment on nigh notebooks is located on the bottom of the example, nonetheless, on some models, the retentivity compartment is under the keyboard. Run across your User Guide for the verbal location of retention modules on your notebook.
Use the following steps to remove and reseat the retention modules:
-
Step 2 - Remove the memory module
-
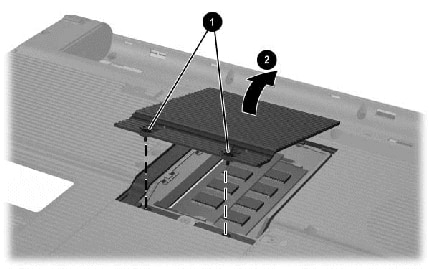
Remove the memory module cover on the bottom of the notebook.
-
Loosen the compartment's retention screws
-
Lift up and remove the memory compartment cover
Effigy : Removing the retentiveness module cover
-
-
Remove the retention modules from the retentiveness slots.
-
Pull the retentivity clips away from sides of the retentiveness module
-
Gently pull the module out of the memory module slot
Effigy : Removing the retentivity modules

caution:
To prevent harm to the retention module, grasp the memory module by the side edges. Practice not touch the metal contacts.
-
-
Reseat the memory module by property module at a 45-degree bending, and pressing information technology firmly into the retentivity slot until information technology is seated.
-
Align the notched border of the module with the tab in the slot.
-
Firmly press the module into the slot.
-
Pivot top edge of memory module downward until retention clips snap into place.
Figure : Reseating the memory module

-
-
After reseating the memory module, replace the cover over the retention compartment before restarting the computer.
-
Align the embrace tabs
-
Tighten the memory compartment cover screws
Figure : Replacing the compartment cover

-
-
If the reckoner fails to boot to the Windows desktop after the memory is reseated and the battery is installed, contact HP for back up.
Examination for memory problems using HP PC Hardware Diagnostics
The Retention Tests include a Fast Test, Quick Test, and an Extensive Test. If you recall there is a problem with the retentiveness, offset endeavor the Fast Test (3 to 5 minutes). If the Fast Test does non find a problem, run the Quick Test (about 10 minutes). If the Quick Test does non detect a trouble, run the All-encompassing Test (about 45 minutes) which also has a Loop Until Error option.
Follow these steps to run the Fast Test:
-
Agree the power button for at least five seconds to turn off the computer.
-
Plow on the computer and immediately press Esc repeatedly, almost once every 2nd. When the carte appears, press the F2 key.
-
On the main menu, click Component Tests.
Figure : Selecting Component Tests from the main carte

-
The Component Tests menu displays. On the Component Tests card, click Memory.
Your Component Tests menu might be dissimilar, depending on the components installed on your figurer.
Figure : Selecting Retentivity from the Component Tests menu

-
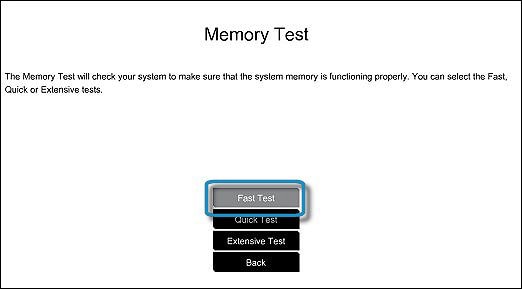
In the Retentiveness Test menu, click Fast Exam.
Figure : Running the Fast Test
-
Click Run in one case. The Fast Exam begins.
-
When the Fast Exam is consummate, the results are displayed on the screen.
If the retention passes the Fast Test merely there is nonetheless a problem with the computer memory, run the Quick Examination.
If the memory passes the Quick Exam just in that location is still a problem with the calculator retention, run the Extensive Test. This test can accept 45 minutes or longer.
If the retentivity fails one of the tests, write down the failure ID (24-digit code) and so you have it available when you contact HP Client Support. The data is also available in Test Logs on the main menu.
Exam for difficult bulldoze problems
Test for hard drive issues using HP PC Hardware Diagnostics
There are six hard drive tests. If you lot think at that place is a problem with the difficult drive, beginning try the Quick Test (2 to three minutes). If the Quick Exam does not observe a problem, run the Extensive Test (2 hours or more than) which also has a Loop Until Error option.
Follow these steps to run the Hard Bulldoze Quick Exam:
-
Agree the power button for at least v seconds to turn off the computer.
-
Turn on the calculator and immediately printing Esc repeatedly, about once every second. When the carte appears, press the F2 key.
-
On the main card, click Component Tests.
Effigy : Selecting Component Tests from the master carte

-
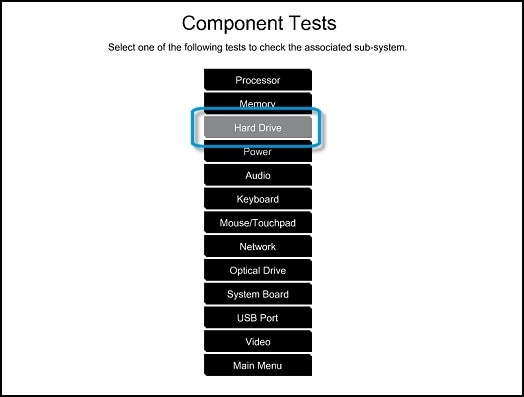
In the Component Tests carte, click Difficult Drive,
Effigy : Sample list of Component Tests
-
In the Difficult Drive Tests carte du jour, click Quick Examination.
Figure : Selecting the Hard Drive Quick Test

-
Click Run In one case.
Figure : Running the Hard Drive Quick Test

-
The Hard Drive Quick Test begins. If the computer has more than one hard drive, select the drive y'all want to test. To examination all the hard drives, select Test All Hard Drives.
When the test is complete, the results are displayed on the screen. Exam results are likewise bachelor in the Test Logs on the main menu.
-
If the hard drive passes the Quick Test, but in that location is however a problem with the hard drive, run the Extensive Test. This examination includes the SMART Check, Short DST, Optimized DST, and Long DST. To run these tests individually, select them from the Difficult Drive Tests menu.
If the difficult drive fails one of the tests, write downwardly the failure ID (24-digit code) so you have information technology available when you contact HP Customer Support. The information is likewise available in Test Logs on the chief bill of fare.
Hp 15 Laptop Black Screen After Login
DOWNLOAD HERE
Source: https://support.hp.com/id-en/document/c01997899
Posted by: davistherk1968.blogspot.com